 Have you heard all the craze about Pinterest?
Are you thinking that you should be jumping on that bandwagon and using Pinterest for your travel blog?
Bloggers the world over, from every different type of niche, are proclaiming the wonders of Pinterest and how it’s bringing in an avalanche of traffic to their blogs.
Is this true, or are they just trying to sell you something?
Heads up: this article is only going to be interesting to people who have their own blog/website and would like to use Pinterest to get their blog in front of more people.
If you’re looking for information on road tripping around around Australia, then these posts might be more up your alley…
Why We Didn’t Free Camp Sooner – How you can avoid the same fate
The Money Post – This is how we did it…
Buying a Used 4WD & Camper Trailer (Part 1) – Prep before you even get here
The Pros and Cons of our Set-Up – Are we happy with our set-up? Find out here
It really is true, Pinterest continues to send loads of traffic to those bloggers that have an ‘on point’ Pinterest strategy. And the great thing about Pinterest is that it’s easy to do, it doesn’t cost money to use, and it’s not an absolute time suck.
Ready to see how YOU can use Pinterest to ramp up the traffic to your own blog?
Great!
In this article I’ll show you WHY you should be on Pinterest, HOW it works to bring traffic to your blog, and THE STEPS you need to take to get started. This is a long one, so grab a coffee and let’s get started…
WHY you should be on Pinterest
I could bore you (and me) with all the stats. But just look at the big numbers below and realise that lots and lots and LOTS of people use Pinterest.


Pinterest call themselves a visual discovery tool. I think that means that people go on to Pinterest to discover new things. New recipes, new fashion trends and new crafts, yes … and if you’re like I was, you thought that’s all Pinterest was good for. Au contraire!
Everything is on Pinterest now. If it’s visual it’s on Pinterest.
Some areas have huuuuge amounts of pins (yep recipes, crafts, fashion, home decor and TRAVEL) and some areas not as much. But the platform is growing at an astronomical speed and has great success at sending traffic to blogs, even brand new ones.
So the number one reason you should be on Pinterest is: Pinterest brings loads of traffic to your blog/website. Loads.
Here are a couple of examples from my own sites:
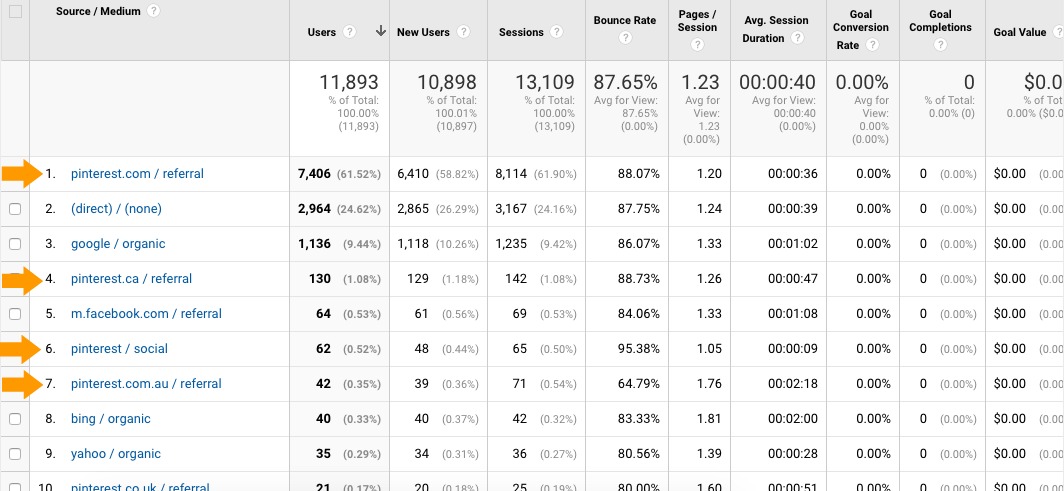
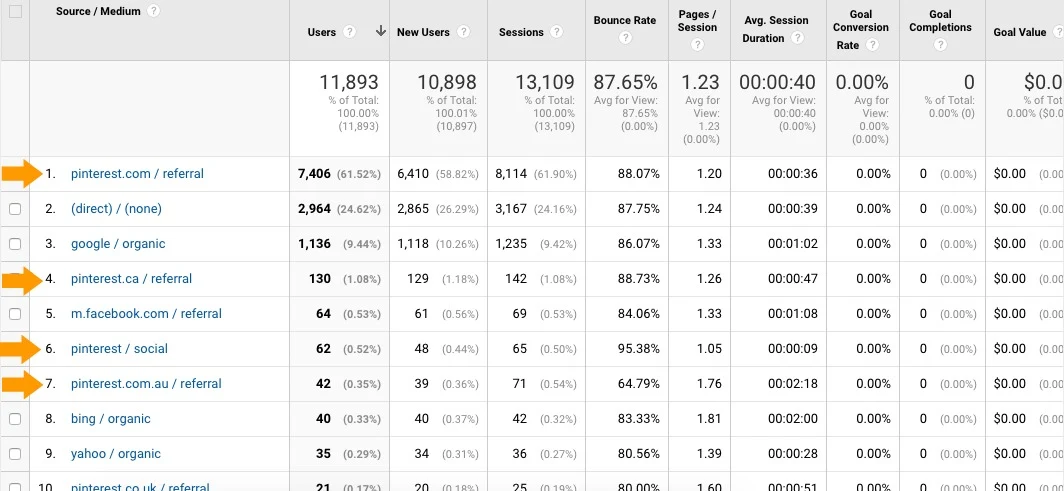
RVObsession.com – blog started in January 2017 and Pinterest account around about the same time. I had a pin go a little bit viral straight away and Pinterest has steadily brought in thousands of readers every month.
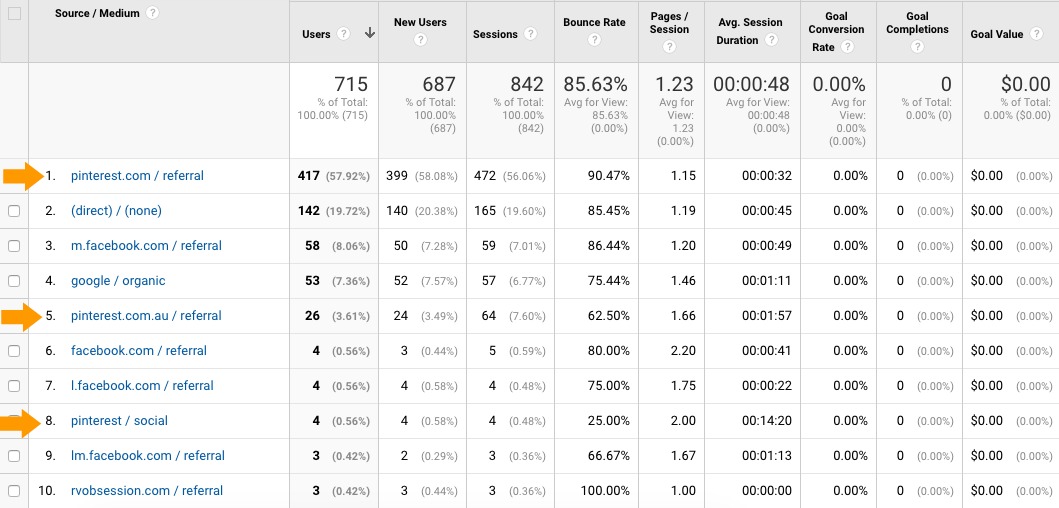
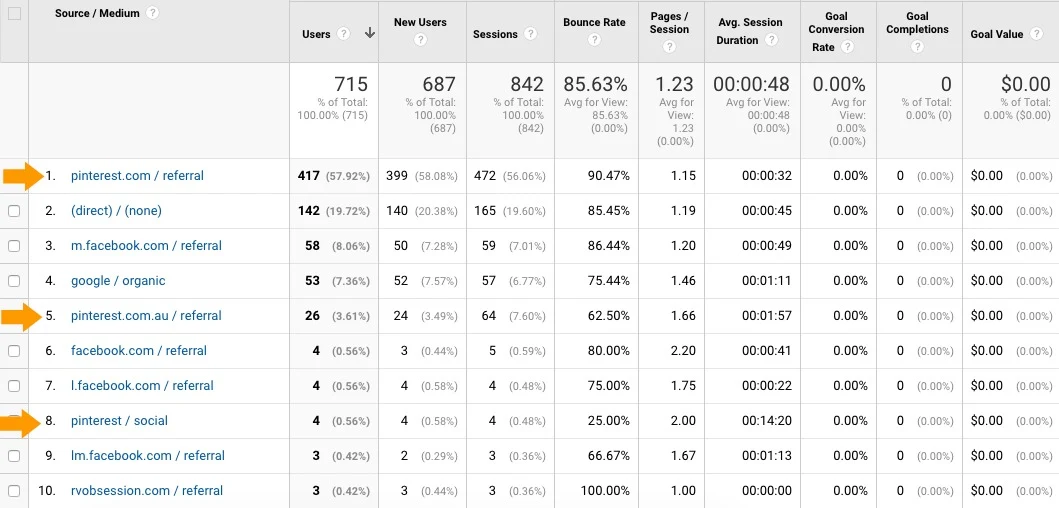
This blog BenAndMichelle.com, started in April 2017 and the Pinterest account at the same time (I’d learnt my lesson with Pinterest and how powerful it can be). We haven’t had a pin go ‘viral’ like it did with my other blog, so traffic hasn’t been massive, just a steady stream of a couple of hundred readers every month.
Enough of blowing my own trumpet, what you really need to know is …
HOW does Pinterest bring traffic to your blog
As I said before, Pinterest calls themselves a visual discovery engine. I’ve heard it most often described as a visual search engine. A google if you will, but for pictures.
So users on this visual search engine are going to be motivated & affected by these two things:
- Visual – You must visually stimulate users in some way. Catch their attention with you bright, bold and visually appealing pin. Give them a reason to stop the scroll to see what your pin is about.
- Search – Give the search engine all the information that it needs to put your pin at the top of any relevant search terms. You do this by using your words. Adding descriptions (and using keywords) to you pins
Smart Feed
When you log into your Pinterest account the pins that you see on your feed are determined by the Smart Feed.
Long gone are the days where you would see all the pins that have been pinned by the people that you follow, in chronological order.
Pinterest is much like Facebook in that they will show you what THEY think you’ll interested in. Sure, that can be frustrating sometimes, but it does mean that you won’t be bombarded by the same pins from the same blogger should they decide to do a massive pinning spree in one go.
So the question is, how do you get on the top of that smart feed?
Well, Pinterest will prioritise pins that are:
- Popular – a pin that is already getting lots of interaction (clicks, repins & comments) is more likely to be shown on your smart feed than an unpopular pin. Much like the way facebook will show you popular posts. This is why it’s so important to have great looking pins with enticing titles, so that people are encouraged to interact with them.
- From good sources – Pinterest likes pins from websites or blogs that have good content on them and where people like sharing the content to Pinterest. Pins from spammy websites, not so much.
What about followers?
You know what… currently it doesn’t seem to matter how many Pinterest followers you have. One of my Pinterest accounts has 3,5000 followers and gets just a couple of hundred clicks to the website each month.
While another has only 500 followers but gets over 7,000 clicks to the blog each month.
Not exactly an avalanche I’ll admit, but it’s a darn site better than the traffic I get via google or facebook (which are a lot more work in my opinion).
So that’s the ‘how’ of Pinterest sending you traffic, now let’s (finally ) get into the nitty gritty of THE STEPS you need to take to set up your Pinterest properly…
THE STEPS to Setting Up Your Pinterest Account Correctly
I’m going to use the word ‘correctly’ a few times in this section. When I say ‘correctly’, I mean having Pinterest set up so that it will send traffic to your blog. You can have a personal account with everything that you’re even vaguely interested in, but that won’t be sending any traffic to your blog.
1. Get your account set up correctly
Get a Business Account
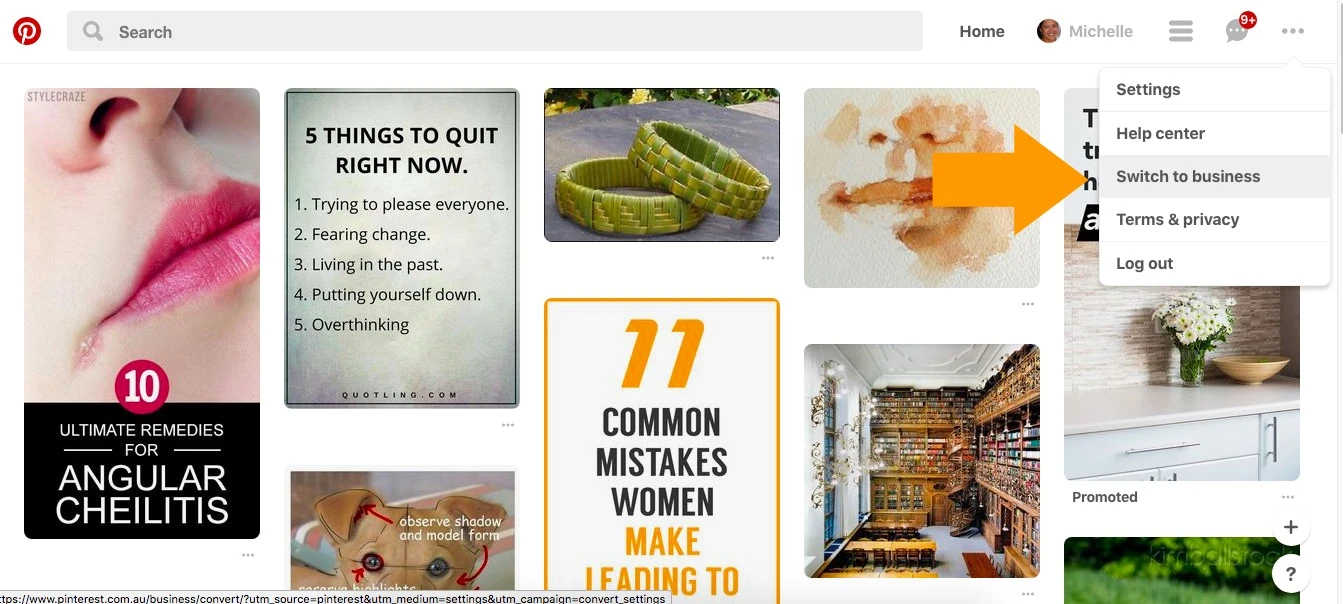
If you’ve already got a personal Pinterest account and this is the one you want to continue using to promote your blog, you will need to change that account over to a business account.
Go to the three dots in the top right hand corner and select Switch to business

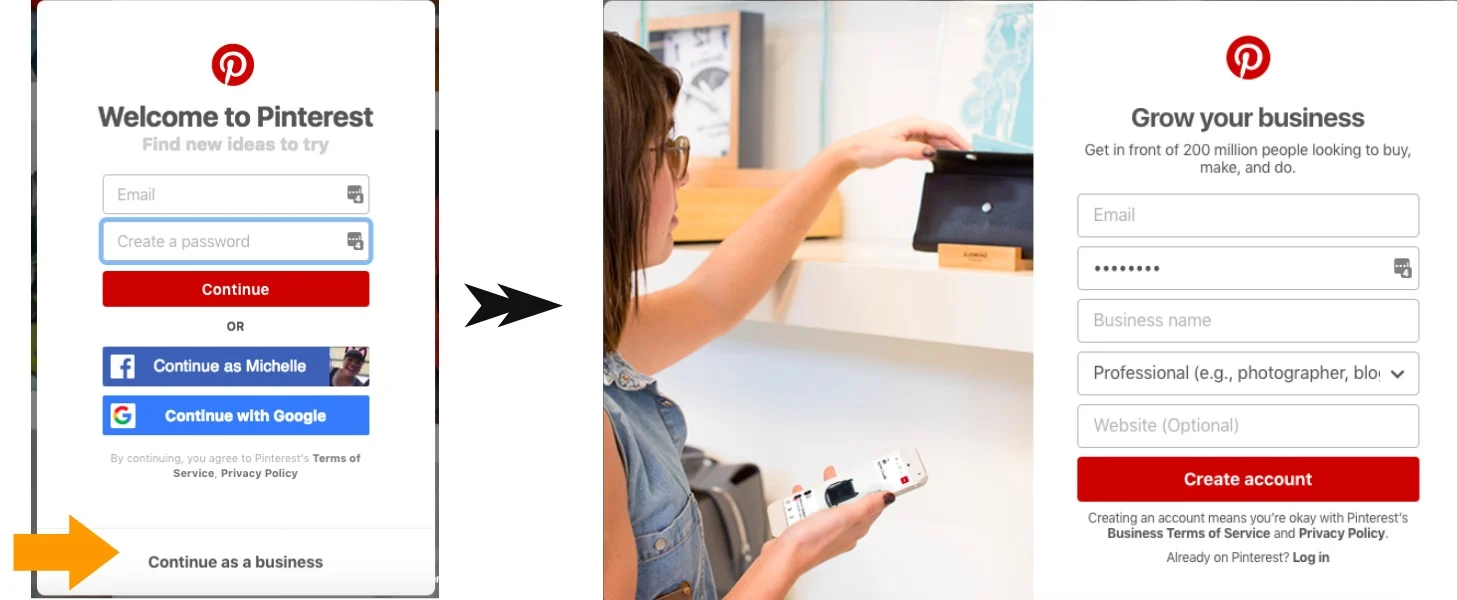
If you don’t have an account, or want to start a new one seperate from your personal account, then just click on Continue as a business and fill in the details on the sign up page.

Complete your Profile
I’m going to mention this again… because it’s important… but Pinterest is a search engine, so you’ve got to give it as much information as possible so that it knows exactly what your content is about and who it will best serve.
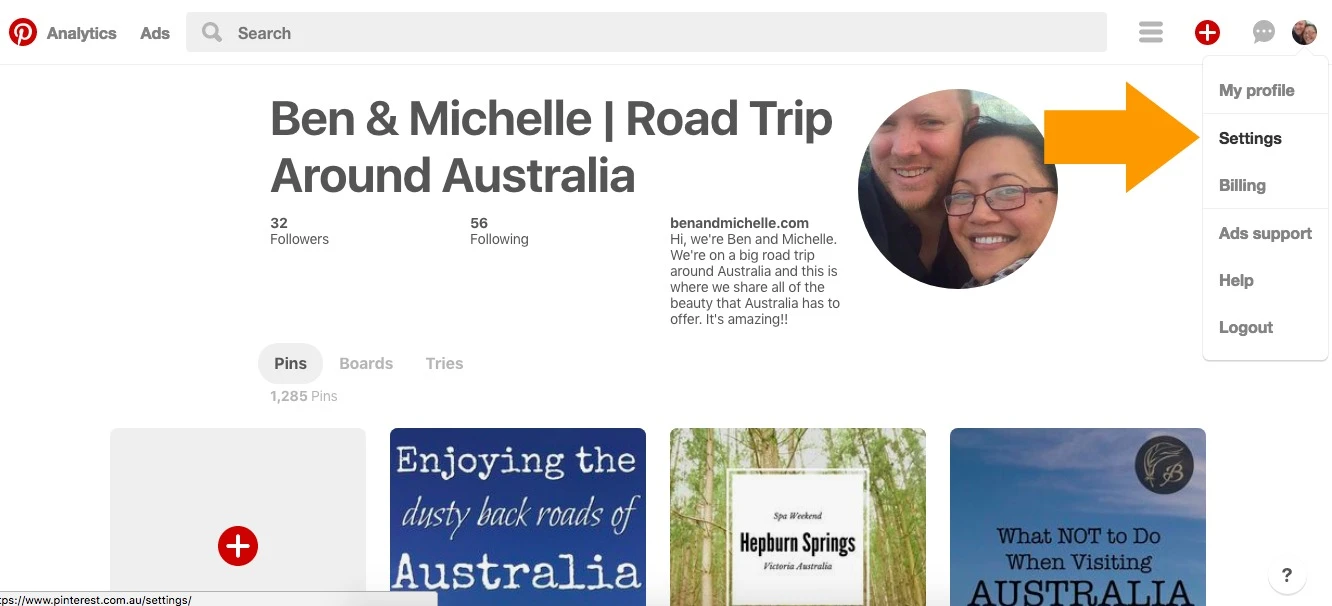
To complete your profile, go to your picture in the top right corner and select Settings. Fill in all the details you can.

Here’s some tips (I’m calling them ‘tips’ but what I really mean is that you gotta do these ‘tips’ if you want to actually optimise your Pinterest game)
- Add a real life picture of you. Where you can see your face. It’s funny how people can get quite turned off by a picture that is obviously being used to hide who you are e.g. blurry, shows the back of you only (wtf?), is so far away it could be anyone etc. You’re a professional aye.
- Add your main niche keywords to your Business Name. Getting another relevant keyword in there and making it very clear what your account is all about.
- Add in a description about you, adding in your niche keyword at least once. This section is not very large, so fit in what you can.
Add 10 boards with 10 pins each
When you’ve got a brand new account, you’ll firstly need to fill it out so that it looks like someone lives there. This is the easy, and fun part of Pinterest!
- Create 10 boards that are related to your main niche, or they could be categories of your blog. So if your main niche is ‘family travel around Australia’, then your boards could be: Family Caravans, Home Schooling, Activities for Children, National Parks of Australia, Caravan Cooking, etc.
- Make sure to add a description to each board. Describe what the board is about using keywords that are related to the board. For example, rather than the description being just: ‘This board is for all my pins on Family Caravans.’ A better description is: ‘Whether you have one child or many children you’ll find lots of information here about the different types of caravans for families. From the best bunk styles, off-road, pop-top & expandable, and pins on family caravan kitchens, bathrooms, laundry and more!‘
- Pin at least 10 pins to each of those boards. You can find pins to pin by doing a search in the search bar at the top of Pinterest. Pin the stuff that YOU like, what appeals to you and sparks your attention and interest.
- This is just a starting point not a hard and fast rule. As you pin more, you may find that you need more boards to properly cover your niche. And you’ll definitely be adding more than 10 pins to each of your boards. But just start with 10 and add more pins to the boards over time.
Rich Pins
Rich Pins are a feature that shows a lot more information on your pins. If you have a look at the two pins below, the one on the left is a rich pin and you can see that the rich pin feature pulls a couple of important pieces of data that the non-rich pin doesn’t:
- The title of the blog post that the pin has been saved from
- The meta description of the blog post
- Date of post publication

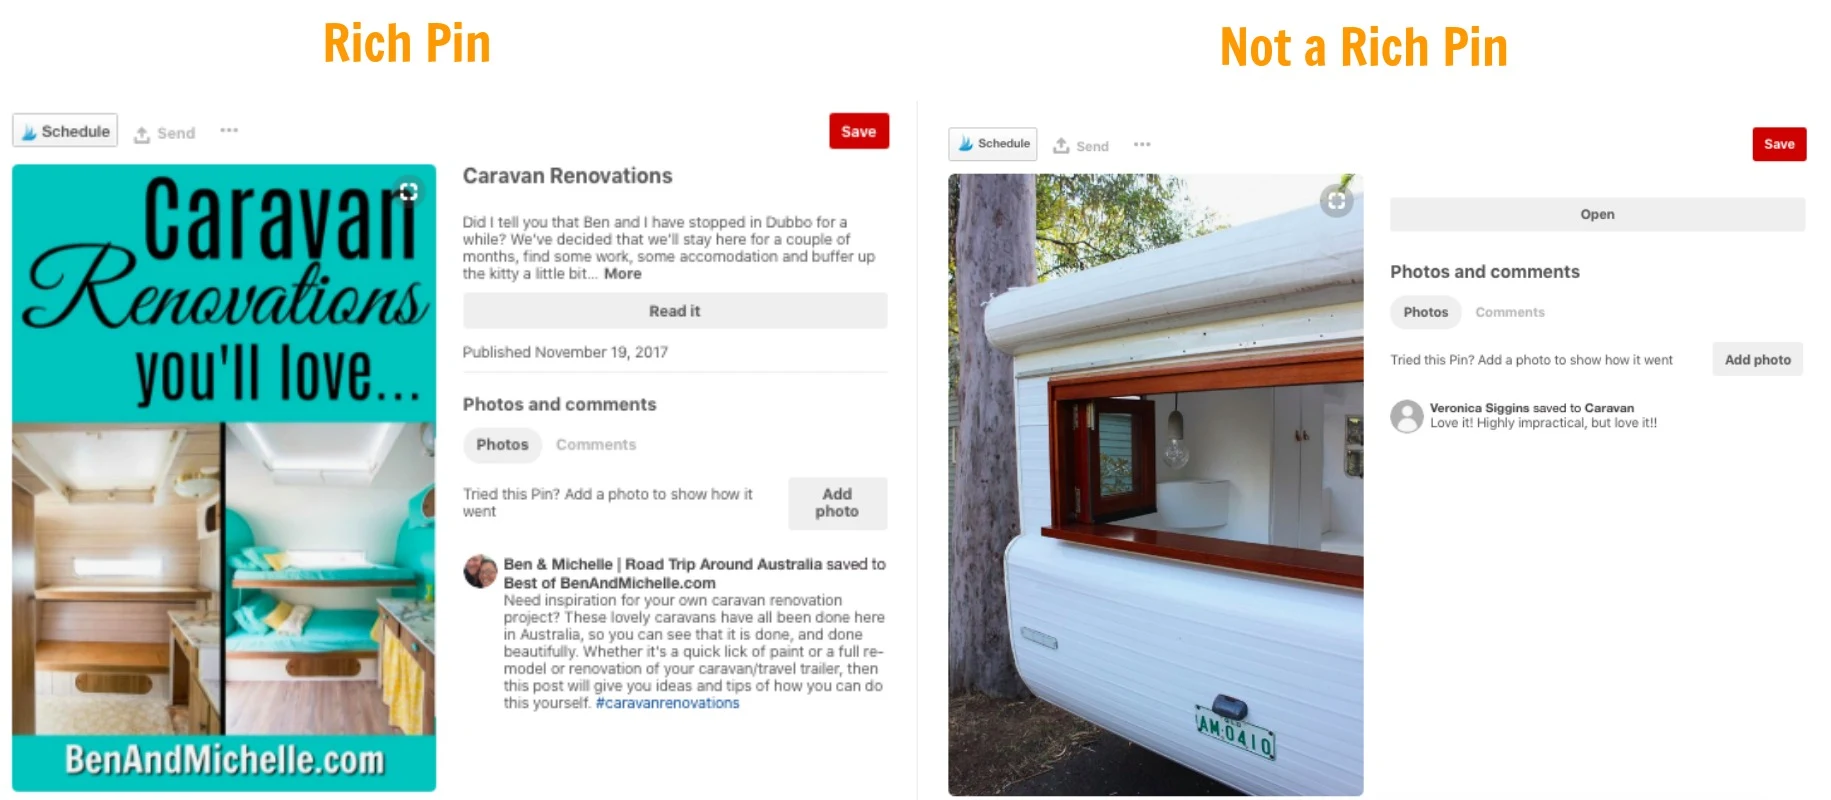
This extra information of the rich pin is important because of what I mentioned earlier, that Pinterest is a search engine, and it uses words (descriptions, keywords, metadata) to determine what the pin is about and therefore who it should be shown to.
Rich pins is only available to business accounts, it requires you to add a piece of code to your website and to have that validated by Pinterest. Here are instructions for how to set up rich pins from the Pinterest Help Centre: Enable Rich Pins for your site
2. Get your blog set up correctly
Make it easy for people to share pins from your website
Add a plugin to your blog so that people can easily share your pins from the blog. There are two types plugins you can use, a social sharing plugin or a ‘Pin It’ button.
The social sharing plugin is usually at the top, bottom or side of the blog post and allows the reader to share the post via a number of social media platforms.

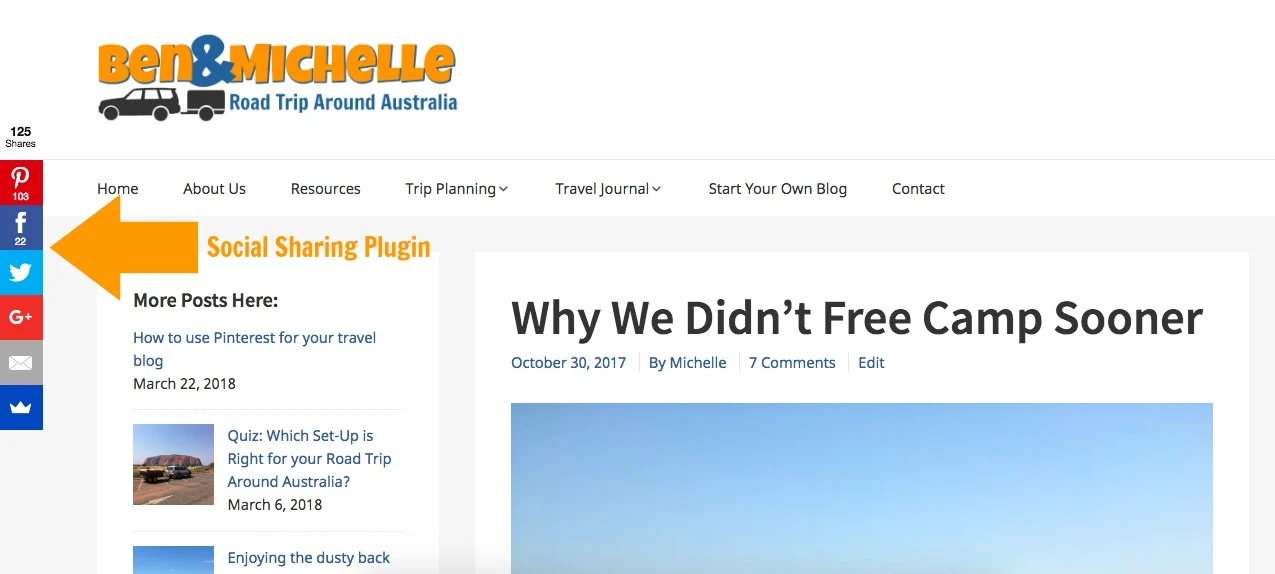
A ‘Pin It’ button is specifically for Pinterest; when a reader hovers over a picture the ‘Pin It’ button appears, making it super easy for that picture to be shared to Pinterest.


Create Pinterest-worthy pins
Now that your blog is ready to pin things to Pinterest, your job is to create some images (pins) that are Pinterest-worthy!
How do you do that? Easy, let me show you how:
- I use PicMonkey, it’s a free photo editor that allows you to do some basic editing on photos, create collages, add overlays and text to create beautiful pins.
- Your pins should be long/tall, the ratio is about 3 units wide by 4 units long. I’ve seen many, many bloggers users the size 735 pixels across by 1100 pixels tall, so that’s what I use.
- Use good photos! If you’re taking your own photos make sure they’re in focus, bright and well composed.
- Add text to your pin that would entice users to click on the pin to see what it’s about. Make sure the text is readable (no impossible-to-decipher fonts please), bold and bright. You may need to use an overlay (under the text) to make the text stand out from the photo behind.
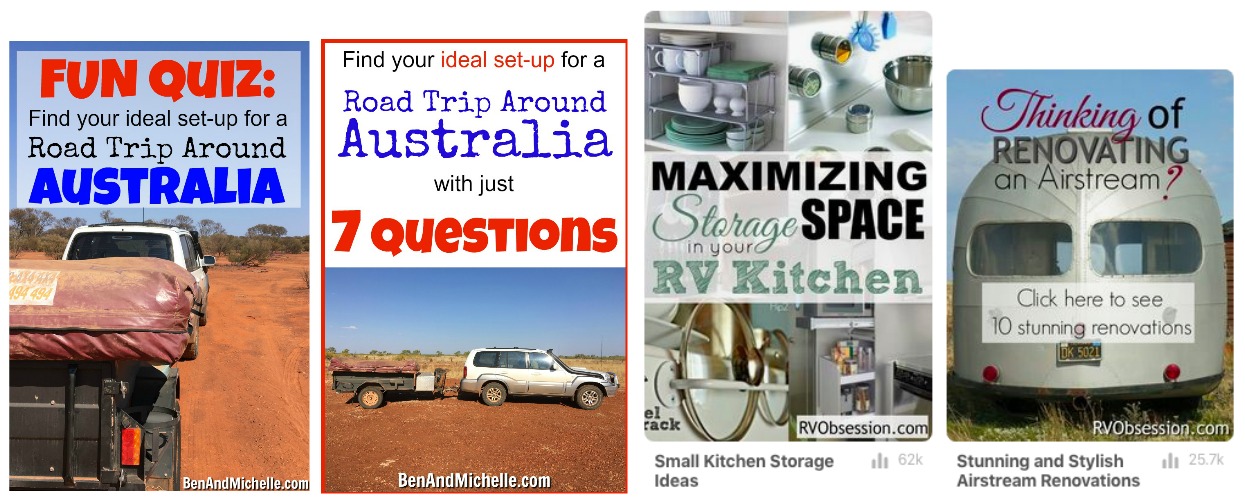
- Make multiple versions of your pinnable image and pin them all to Pinterest. You’ll then be able to see what pins work best, and create more like that.
- Go easy on yourself (I’m putting this here for everyone, like me, who thinks they should be able to do all this stuff perfectly the first time round!) The first couple of images you create may not be ‘perfect’ but get them on your blog and see how they go. One of my very first pins (from my other blog) hit the viral jackpot and has now been re-pinned over 60k times and sent thousands of visitors to my blog.
Some examples:

- When you add your pinnable image to your blog post make sure to add an Alt Description to your pin. (see picture below for where the Alt Description box is in wordpress.

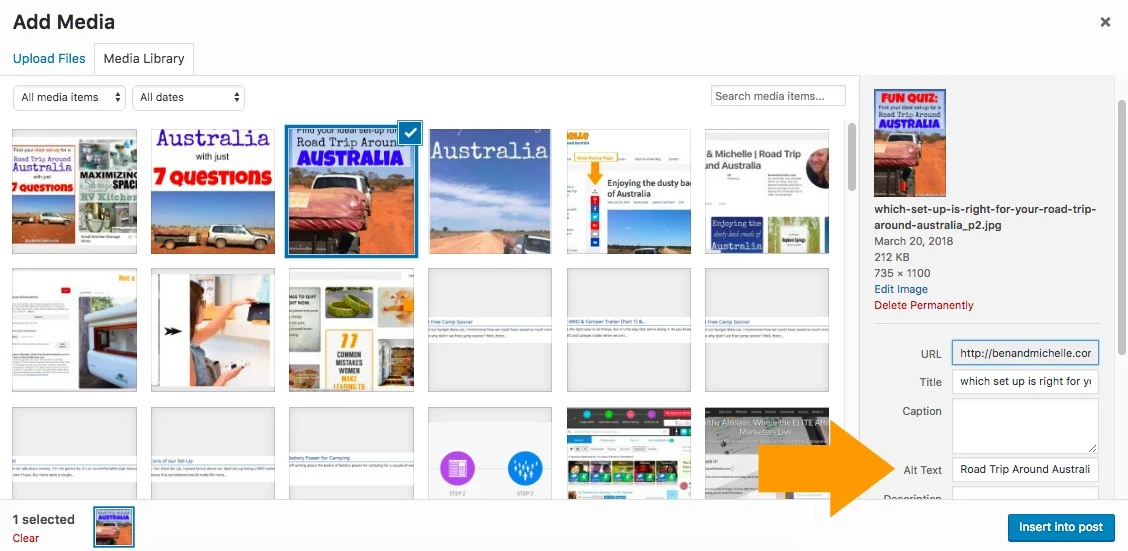
- Hashtag – the jury is out on the relevance and usefulness of hashtags. Since they do seem to have trumps over the alt description on your main feed I definitely use them, but just one or two.
Now that you’ve got everything set up correctly, these are the things you need to do to keep on top of your Pinterest game:
3. Regular Interaction
Pinning – Just like any normal Pinterest user would, you’ll need to be regularly pinning. I don’t have a definition of what ‘regular pinning’ means. But it doesn’t mean adding 300 pins in one day and then not logging in to your account for 3 weeks. I log into my Pinterest account most days, and when I see a pin I like, I pin it. Pretty simple really.
Follow other people / boards – When I’ve pinned that pin I like, I also go and check out the person who pinned it, if I like most of what is on that person’s Pinterest account, I’ll follow them. But more often I find that only a couple of their boards are interesting to me, so I’ll just follow those boards rather than the whole account.
Comment – Also, I’m trying to be a little bit more interactive (but like, a real person) on Pinterest and if there’s a pin that I really like or I enjoyed the blog post that it sent me to, I’ll write a quick comment on the pin. I’ve got no stats to back this up, but I feel like it shows your a real person and helps with giving you a little bit more exposure. (That is, until the spammers get on that bandwagon and leave those stupid “I love your blog, come and check out mine” comments. But we haven’t reached that point yet.)
4. Join Group Boards
There are Group Boards on Pinterest, and from a business point of view, they are worth your time and effort to get on to. A group board is where a number of collaborators are all able to add pins to the one board.
You can identify a group board by the profile picture, it will show more than one photo.
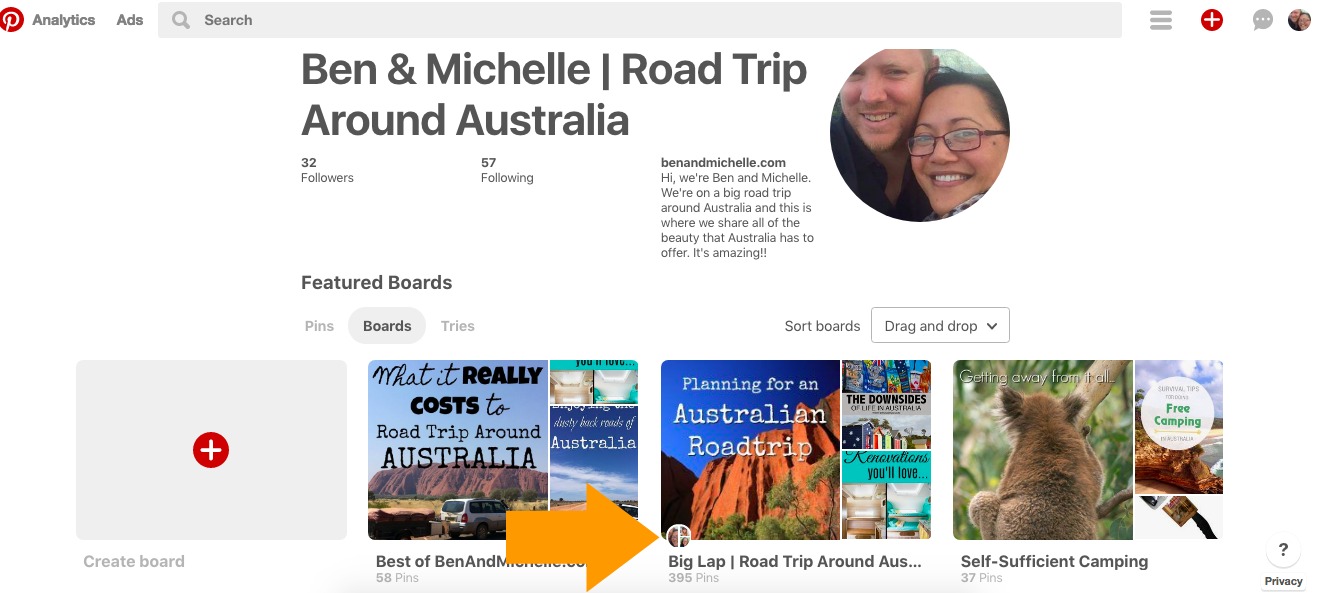

The beauty of Group Boards is that it can give you exposure to a larger audience, especially when you’re first starting out. So look for Group Boards that have a large (well, larger than you) following and are in your niche.
You’ll see that there are dozens of Group Boards that are not niche specific at all. If you have the choice between a niche specific board and a non-niche specific board, I would go with the niche specific. It may have a smaller following, but the content is going to be relevant to your audience and will help Pinterest to know exactly what you’re about.
For example, if my niche were about doing a road trip around Australia, then the ‘Travel Australia Community’ group board would be perfect for me. It has a lot more followers than I do and it only has 46 contributors.

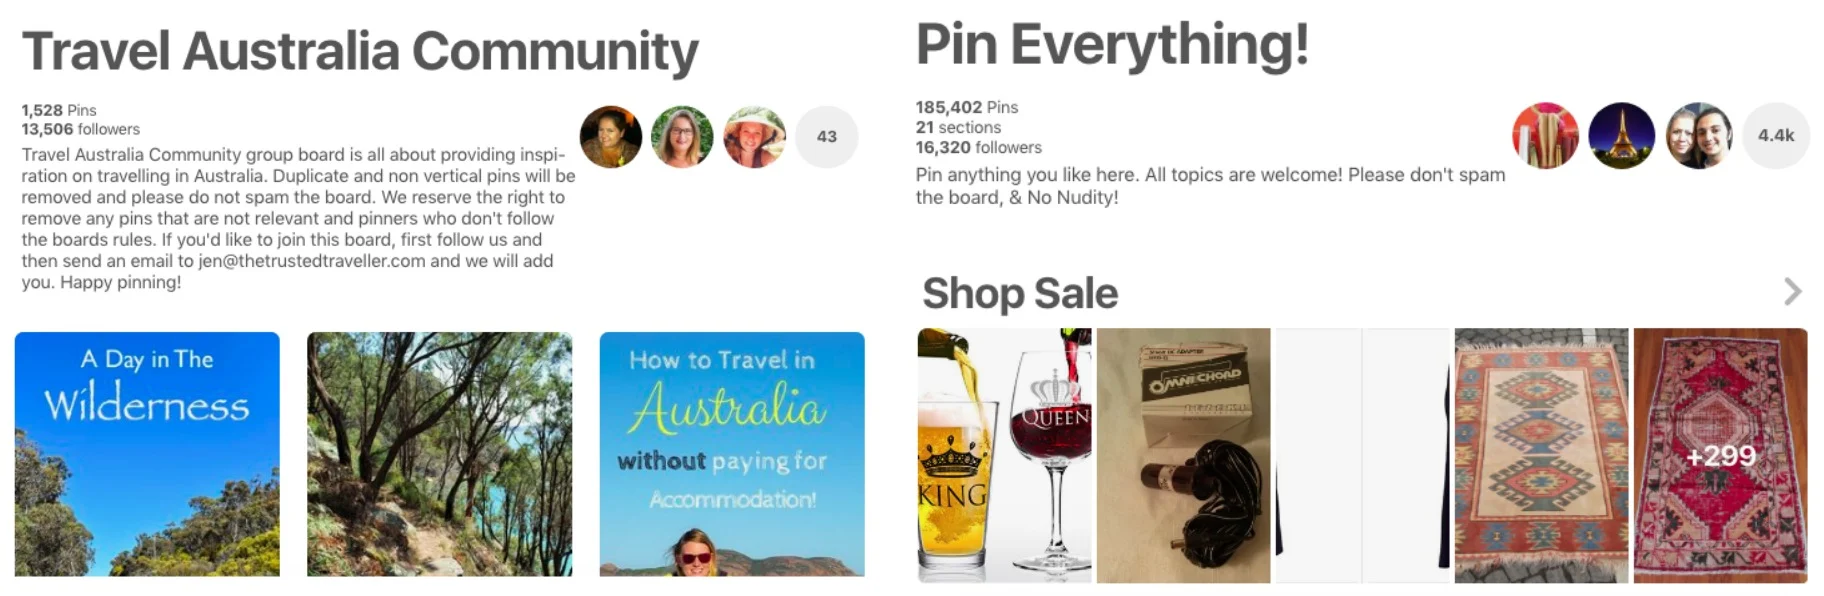
Compared with the ‘Pin Everything!’ group board which has more followers, but it also has over 4,000 contributors which means the board moves very, very fast. (You’ll pin something and within seconds it will already be way down the board as there are so many people pinning stuff to it.)
But more importantly, the board isn’t niche specific, it’s about anything and everything so why would anyone be interested in my pin about Uluru when they’re passions are star wars and anime?
How to find Group Boards
The best way to find group boards is go to the Pinterest profile of other accounts in your niche and have a look through all their boards. You’ll see that they’re likely in Group Boards, so just try and join those same boards.
How to join Group Boards
How do you join Group Boards, I hear you say?
They’ll usually have instructions in the description for joining the board; but if not, then you need to make contact with the first profile, that’s the person who owns the group.
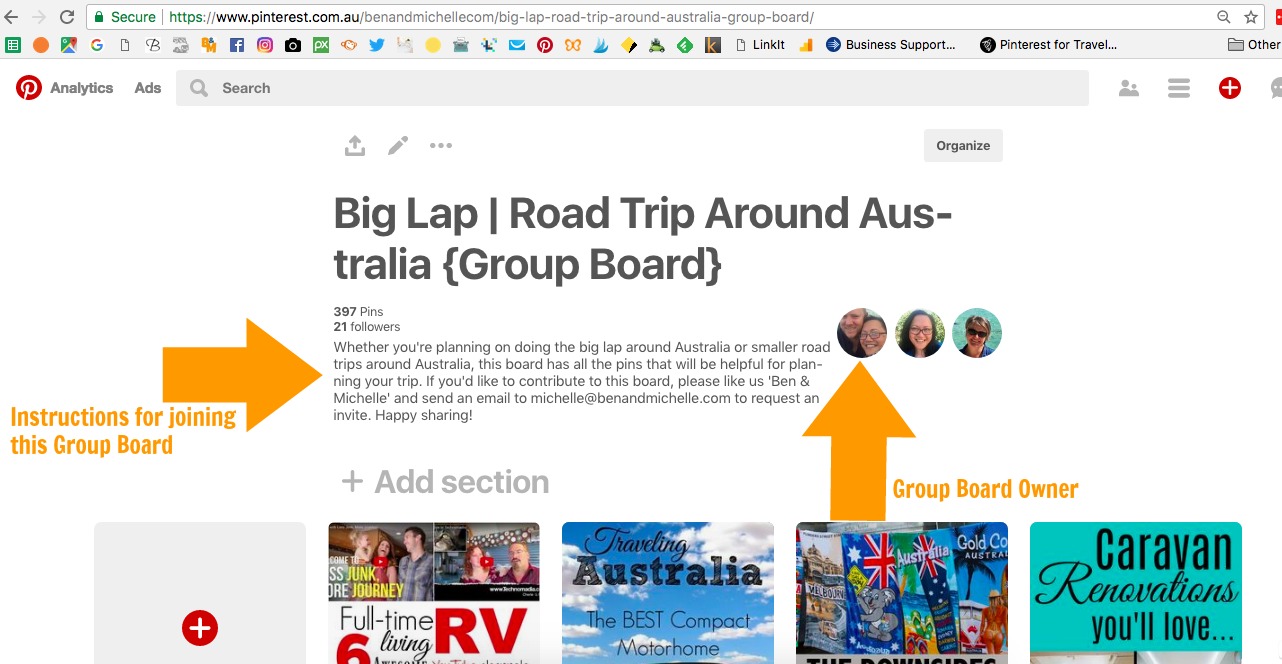

If there are no instruction in the description, then you need to make contact with the first profile, that’s the person who owns the group. To make contact with them you’ll need to go to that persons profile and if they’ve got a website, go there and contact them via their email address or contact form. Maybe see if you can find them on Twitter or Facebook and make contact through that medium.
Or you could just send them a private message through Pinterest. (Your messages can be found in the top right corner in the speech bubble with three dots.) But I’ve found that Pinterest messages is not the most effective way to communicate, depending on your settings you may not even realise you’ve got messages in there, especially if you’re not logging into Pinterest regularly. I’ve had messages sit there for weeks, not even realising they were there; and I log in to Pinterest every day!
When you contact the Group Board owner it’s a good idea to indicate in some way that you know who they are (you’ve had a look at their blog or you like all the pins that they’ve got, the theme of their Pinterest or something like that) and that you would like to join their Group Board as a collaborator. Tell them why you think your content would be a good fit for the board and that you’ll stick to their rules. Just be your friendly self is what I’m saying, but also giving them a little love is both polite and appreciated.
And importantly, give them your Pinterest account name. For example: https://www.pinterest.com.au/benandmichellecom/
It gives the Group Board owner a chance to go and have a look at your account to see what type of stuff you pin and whether they think you would be a good fit. And then they can invite you straight away. As a Group Board owner it’s a right royal pain having to either hunt for the persons profile, or email them back and ask them for it. Just give them your Pinterest account!
While Group Boards are not the be all and end all that they used to be, they are still a good way of getting your pins in front of more people; so they’re especially helpful for new pinners to get their account going.
5. Scheduling tools
I mentioned earlier that you need to be regularly pinning on Pinterest. But seriously, who has time for that!?
I use a scheduling tool and load up my Pinterest feed with all the pins that I want to be pinned over the coming week/month, and then it’s done. I don’t have to log into Pinterest every day because I know that pins are regularly being pinned. I schedule about 20 pins per day, some of them are my pinnable images that have been pinned from the blog (and I just keep repinning them to different boards) and some of them of other peoples pins that are in my niche.
Tailwind


The scheduling tool I use is Tailwind. Tailwind is the only Pinterest-approved scheduling tool available and though it took me quite a while to get used to it, I think it’s awesome now.
Apart from the fact that you can schedule pins ahead of time, Tailwind has a slew of powerful analytics that you can use to schedule your pins for optimal times during the day (when YOUR followers are most active), determine which boards (including group boards) are performing the best for you and even which pins are performing the best.
Board Booster
In the interests of transparency, I have also used another scheduling tool Board Booster, and to be totally honest, I love it. It was much easier for me to understand how it works and how to work it. And it’s cheaper, as cheap as $5 per month.
But, it’s not Pinterest-approved and it actually goes against the T&Cs of Pinterest. Also, it’s not quite so easy to pin exactly the pins you want and in a specific order, and certainly not at specific (but random) times during the day. And there’s no analytics to help you see how you’re going.
So that’s why I recommend Tailwind. It may take a little time to get your head around how it works, but I think it’s the best only Pinterest scheduling tool to use. You don’t need Tailwind (at all!), but it makes my life easier so I’m happy to pay for it.
You can try Tailwind for free here.
Putting it all together
Now that you’ve got everything set up you are well on your way to amping up traffic to your blog, increasing your exposure and attracting those readers you want on your blog.
One last step before you go though:
Patience
Everyone is going so cray cray over Pinterest that it would be easy to think that all this traffic is going to be dumped on your site over night. While Pinterest does seem to work pretty fast, it’s not that fast. So hold your horses there, cowboy.
I would say you need to give it a month. Keep adding pins (yours and others), keep refining your pin creation so that they look great, follow other relevant people/boards, join relevant Group Boards, comment on other pins and keeping regularly pinning. It won’t happen overnight, but it will happen. Trust me.
Phew! That’s a lot on Pinterest!
I know I’ve said that using Pinterest for your travel blog is not difficult, and I promise you, it’s not. The steps I’ve outlined above will give you a really good start in your Pinterest game. Do everything I’ve said above and you’ll be home and hosed.
You just need to go through one thing at a time. Don’t get get overwhelmed by it all.
You got this!
If you’re determined to grab yourself a piece of the Pinterest pie, but when you look at all the above you can’t help but mutter under your breath, “when am I going to have time for that?!!”; then give me a holler.
I’m happy to take on a couple of new people and their blogs and do all their Pinterest for them. Email me at michelle@benandmichelle.com or via the contact form and we can talk about what you need and how much it will cost.
Want to start you own blog? It’s quick, easy and free! Click here to see just how easy it is…


Coucka
Thursday 12th of April 2018
Awesome blog! I am really excited to start a Pinterest account. Thank you so much this information is fantastic.
Michelle
Thursday 12th of April 2018
Thanks Karen, I'm glad the information is helpful to you. :-)